
APFS, Containers, Data Protection, Multihost, Multipath, Performance, RAID, Thunderbolt
Fast Friends
Experience ultimate performance and flexibility with Pro Data and the M1 Ultra Mac Studio:
- Up to 10GB/s reads, 6GB/s writes to a single APFS volume
- 18 streams of 8K30p ProRes 422 playback on M1 Ultra simultaneous with nine 8K30p streams on M1 Pro
- Massive capacity and expansion through Thunderbolt daisy-chaining
- Collaborate on-the-fly with multiuser Storage Handoff
As part of our exploration of benchmarks, we documented Pro Data’s incredible 5GB/s performance using breakthrough NVMe multipathing on M1 Pro Apple Silicon. With twice the power of M1 Max and six full-speed Thunderbolt ports, we couldn’t wait to see what the new Mac Studio with M1 Ultra could do.
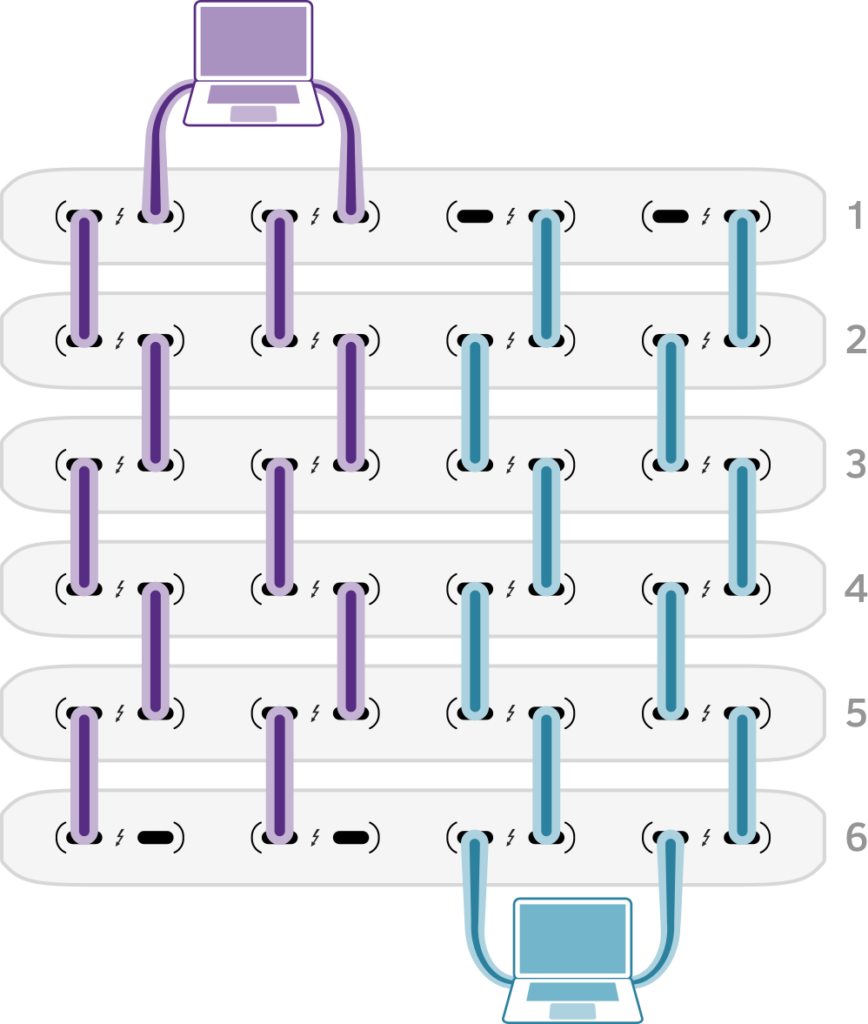
In this article, we’ll detail our methodology and results of our experiment with three Pro Data devices, and explore the massive potential for expansion using Thunderbolt daisy-chaining. To review, Pro Data provides eight full-speed Thunderbolt ports in four pairs to enable:
- multipathing for maximum performance
- daisy-chaining for connecting up to six devices per port, and
- multiuser access for seamless collaboration
Best of all, these features all work seamlessly and/or with minimal user interaction. Multipathing to increase throughput requires only a second Thunderbolt connection to a separate Pro Data port pair. Daisy-chains automatically recognize newly-added downstream devices. Multiple computers can each plug into a port pair while the system is operational, and storage containers can be handed off between peers with a single click.
Here are a few examples of how connectivity allows for flexibility to adapt to different environments and workflows.
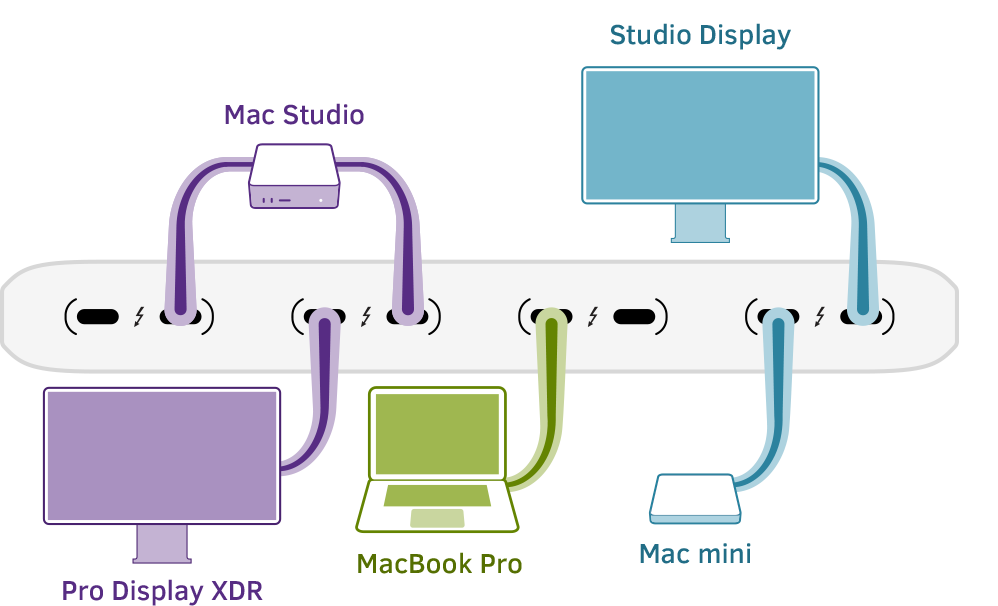
Flexible Connectivity
Port pairs auto-negotiate full-speed connections upstream to computers and downstream to peripherals
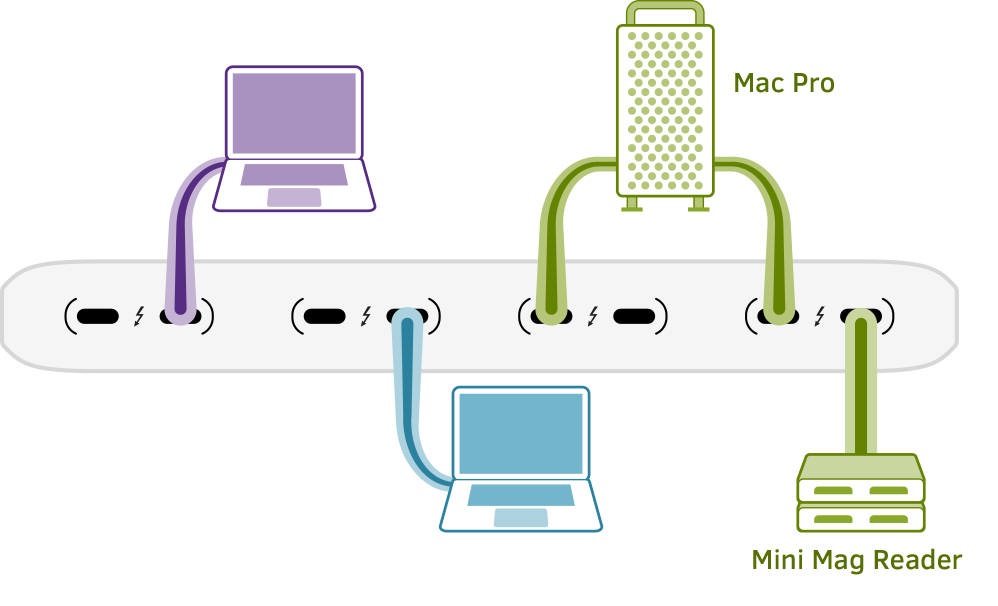
Offline Automation
Delegate time-intensive tasks like data ingest and rendering for increased efficiency
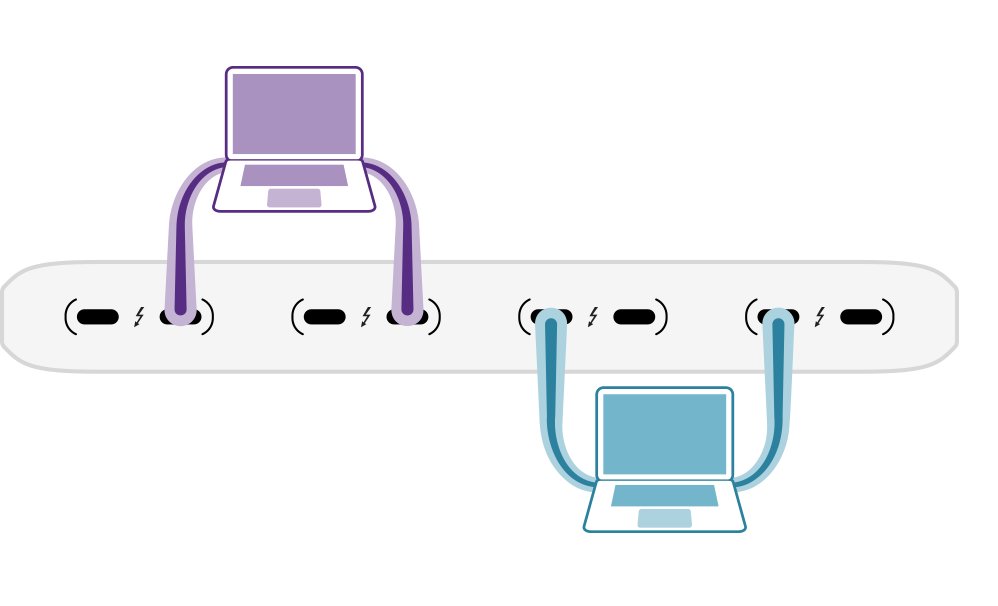
Ultimate Throughput
Two computers, each multipathed to achieve maximum performance
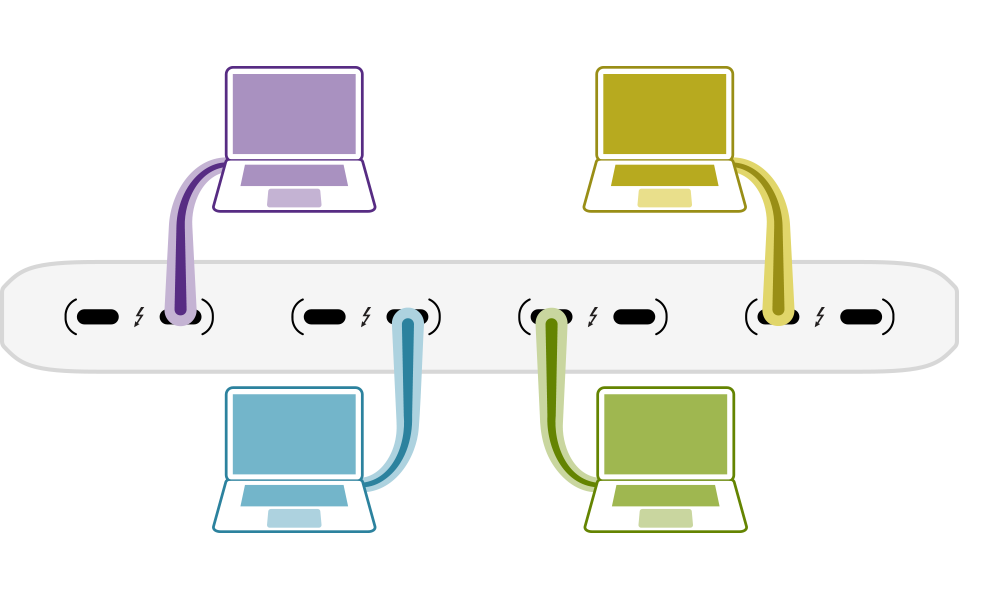
Streamlined Workgroups
Connect up to four computers simultaneously for a collaborative workflow using Storage Handoff
Massive Expansion
Single or multipath daisy chains can increase capacity up to six Pro Data devices while providing optimal connectivity and speed
Multiple Pro Data devices can be used to expand capacity on-the-fly without compromising performance. With Pro Data’s four pairs of Thunderbolt ports supporting daisy-chains of up to six devices each, a 24-unit 24TB Pro Data system can grow up to 576TB in RAID-0, or 480TB using RAID-6 with double-parity protection against SSD failure. The primary advantage to this modular approach is that by decoupling storage from the computer investment, your data is resilient, hardware-encrypted, and portable across upgrade cycles.
Our experiment involves creating large containers on separate Pro Data devices, then combining them to create a huge storage target that macOS sees as a single, super-fast 36TB APFS drive.
Hardware Setup
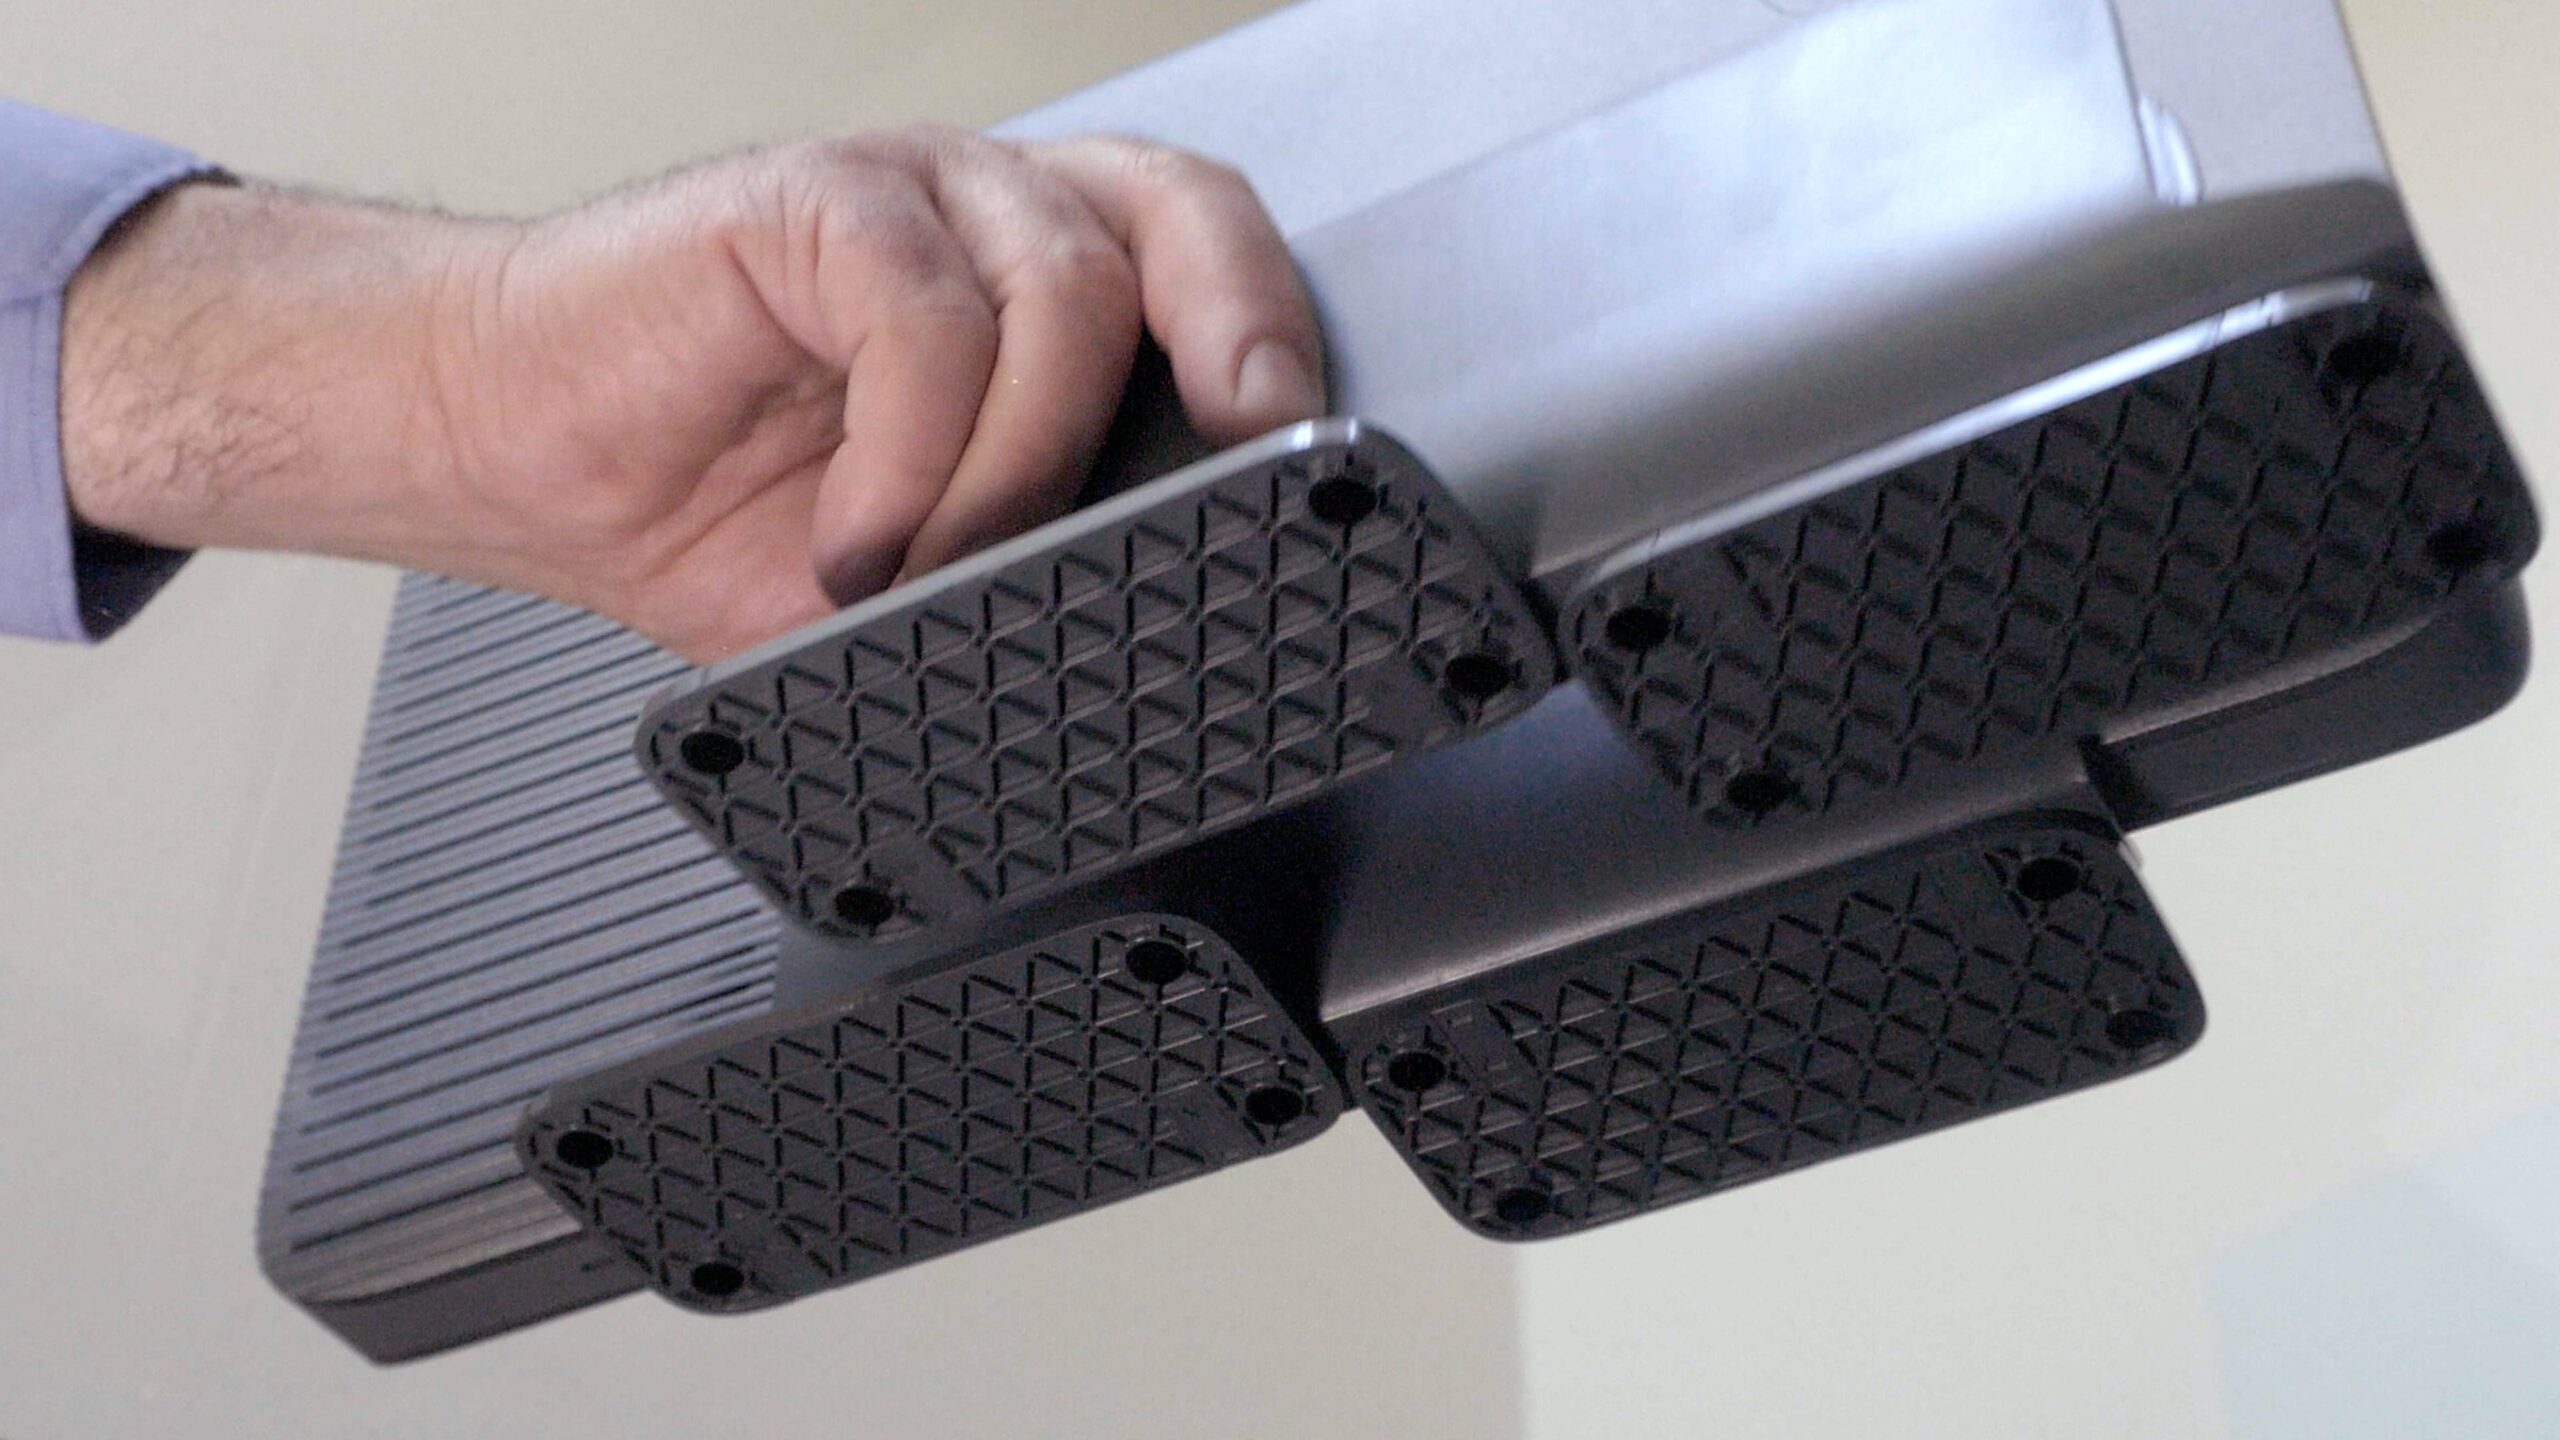
Each Pro Data ships with an interlocking stand to minimize workspace footprint while multiple devices are narrowly-spaced to promote air circulation.
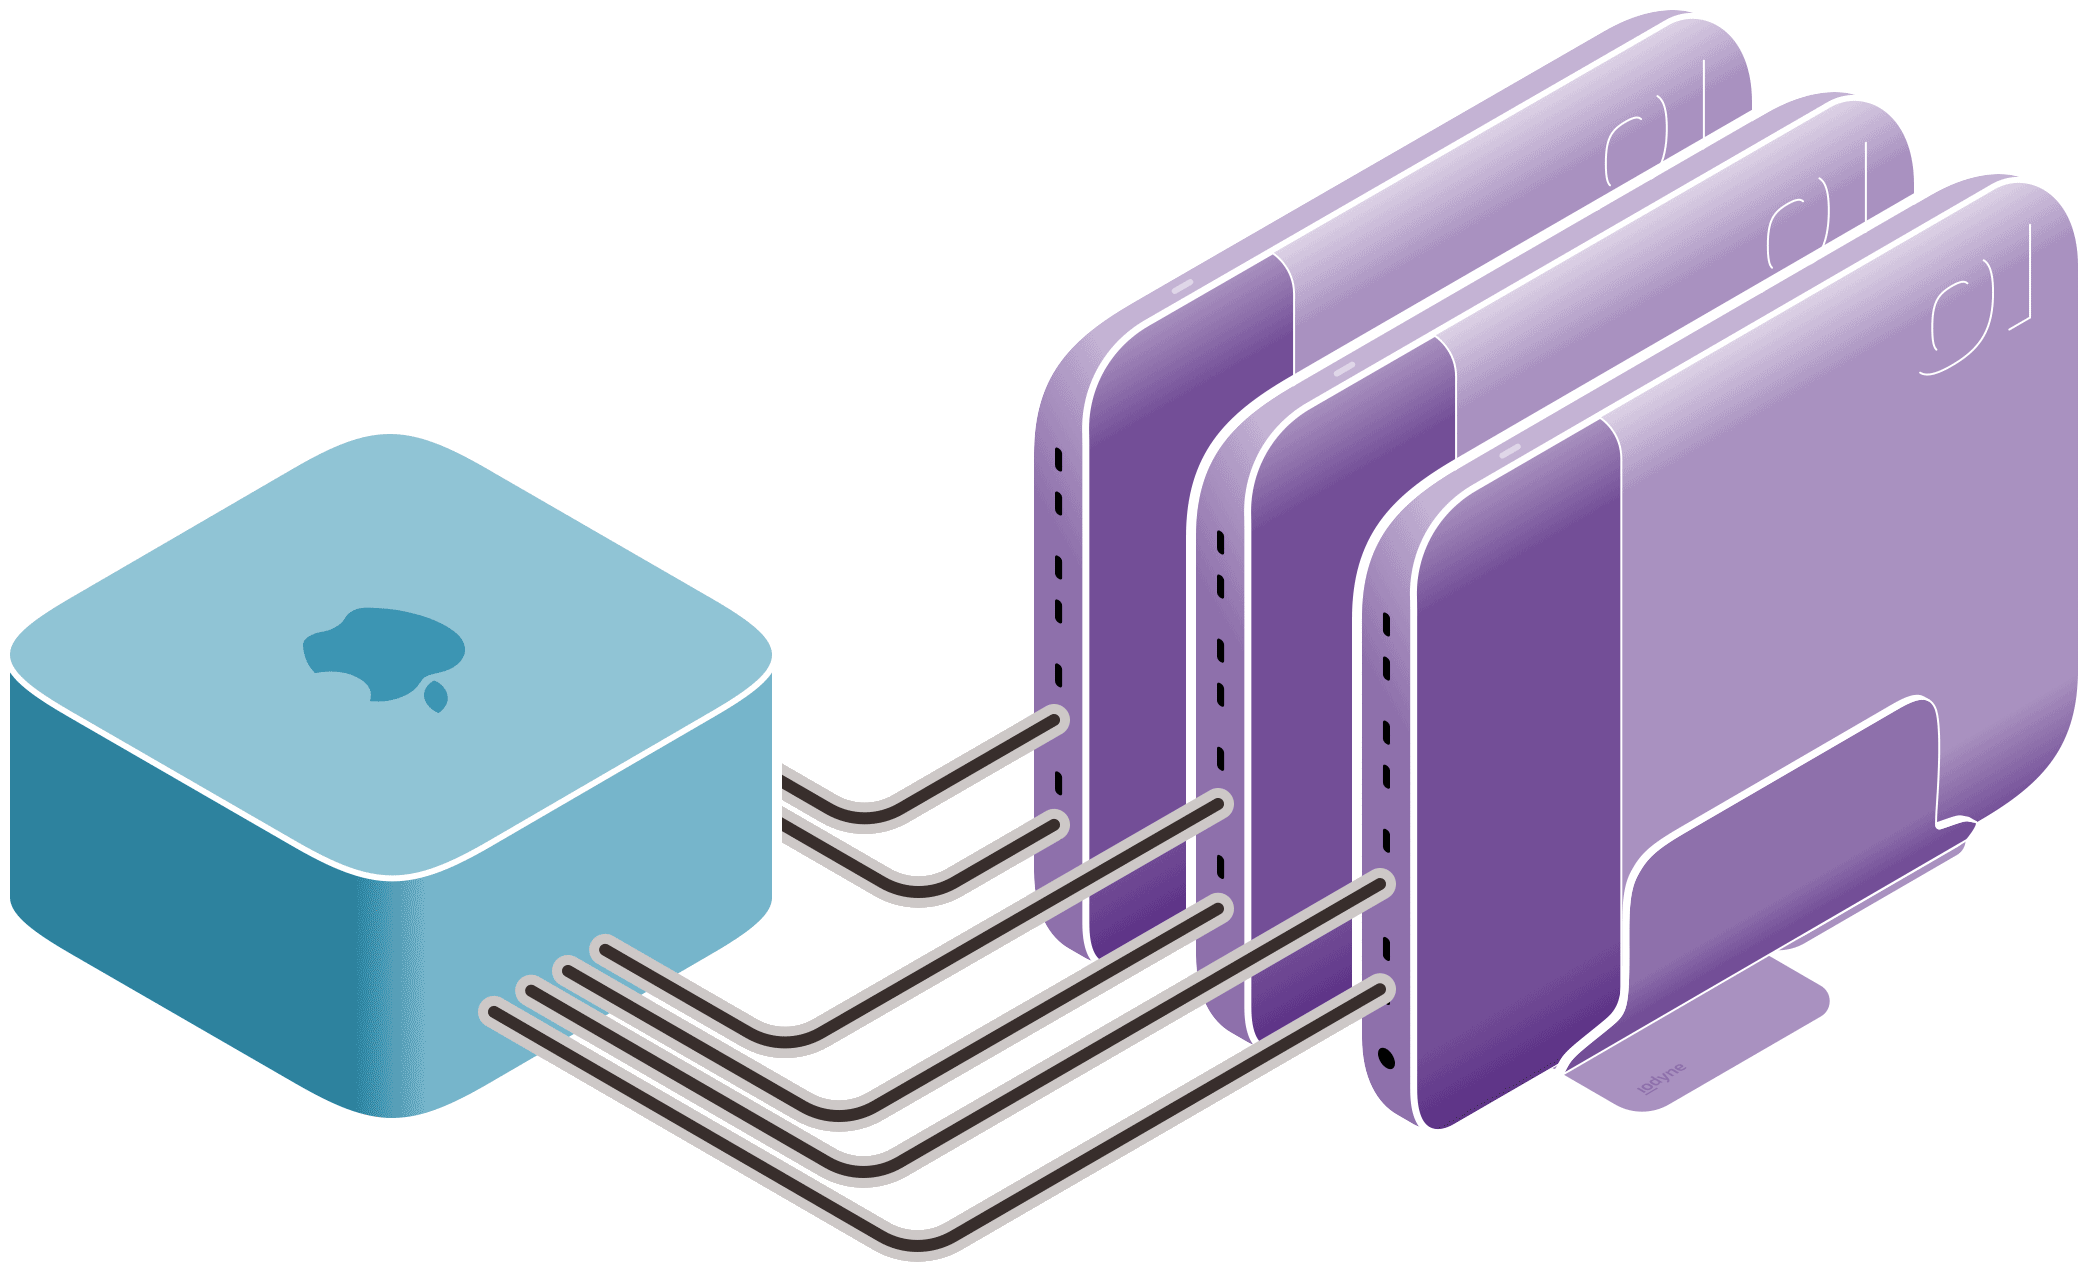
The Mac Studio comes standard with four full-speed Thunderbolt ports on the back, while the M1 Ultra model adds two Thunderbolt ports to the front. This incredible amount of expandability enables multipathed connections to three Pro Data devices, shown here from the back of the Mac Studio.
With everything powered on and all three Pro Data devices registered and secured with a device password, we’re ready to create our first container. We’ll walk you through the exact steps to reproduce our experiment, but for a refresher on storage containers, see Provisioning Pro Data.
Provisioning Storage
Expanding storage shouldn’t add complexity – monitor hardware status and provision containers on any Pro Data from the same intuitive interface. All connected devices appear in the iodyne utility under the Devices menu, and can be accessed using the forward/back buttons on the Usage or Status tab, shown here:
To showcase the maximum performance of Mac Studio, we provisioned an identical RAID-0 container on each 24TB Pro Data, using half their available storage, 12TB each. By default, containers are formatted using APFS, but as we will be striping them together in a RAID set, we will leave them unformatted, or Raw, taking note of each container’s disk ID (disk4, disk5, and disk6, respectively); they will not appear in the Finder until they are formatted in our final creation step. Note: we did not assign custom passwords to any of the containers for simplicity, however all data is transparently hardware-encrypted, with keys stored in a Secure Enclave.
Creating the RAID Set Using AppleRAID
Most projects can fit within the capacity of a single 24TB Pro Data, and with Thunderbolt daisy-chaining, new containers can accommodate additional assets as your storage needs expand. But some cases might require a truly massive container. With the combination of macOS AppleRAID and Pro Data, a RAID 6+0 or RAID 0+0 container is able to take advantage of the added performance and capacity of more than one Pro Data. We’ll provision containers from each Pro Data, and then use AppleRAID to stripe them together into a huge 36TB APFS volume with massive multipathing performance.
Basic AppleRAID functions are available through macOS Disk Utility, however Terminal commands provide settings that can be tuned for optimum performance. For example, striping storage together in a RAID set parallelizes work across all participating devices at a predefined chunk size, and we have found 1MiB to be ideal for large video files on Pro Data.
First, we create the RAID stripe using the following Terminal command using our disk IDs from the provisioning step. Disk IDs are listed in the iodyne App under the ID column when the container is attached:
$ diskutil ar create stripe example1 free disk4 disk5 disk6
Started RAID operation
Unmounting proposed new member disk4
Unmounting proposed new member disk5
Unmounting proposed new member disk6
Repartitioning disk4 so it can be in a RAID set
Unmounting disk
Creating the partition map
Using disk4s2 as a data slice
Repartitioning disk5 so it can be in a RAID set
Unmounting disk
Creating the partition map
Using disk5s2 as a data slice
Repartitioning disk6 so it can be in a RAID set
Unmounting disk
Creating the partition map
Using disk6s2 as a data slice
Creating a RAID set
Bringing the RAID partitions online
Waiting for the new RAID to spin up "<set-id>"
Mounting disk
Could not mount disk7 after erase
Finished RAID operation
We’ve now created the stripe “example1” from disks 4, 5, and 6. diskutil returned a disk ID of disk7 for this new storage target, which we will use to customize using our preferred chunk size of 1MiB = 1,048,576 (220) bytes:
$ diskutil ar update ChunkSize 1048576 disk7
The RAID has been successfully updated
Finally, we will format disk7 as an APFS volume, making it available to the Finder as a single 36TB drive, here also called “example1″:
$ diskutil apfs create disk7 example1
Started APFS operation on disk7
Creating a new empty APFS Container
Unmounting Volumes
Switching disk7 to APFS
Creating APFS Container
Created new APFS Container disk8
Disk from APFS operation: disk8
Finished APFS operation on disk7
Started APFS operation on disk8
Preparing to add APFS Volume to APFS Container disk8
Creating APFS Volume
Created new APFS Volume disk8s1
Mounting APFS Volume
Setting volume permissions
Disk from APFS operation: disk8s1
Finished APFS operation on disk8
You can validate the RAID set and its constituent containers using a simple status command:
$ diskutil ar list

AppleRAID sets (1 found)
===============================================================================
Name:                 example1
Unique ID:            <set-id>
Type:                 Stripe
Status:               Online
Size:                 36.0 TB (35983841034240 Bytes)
Rebuild:              manual
Device Node:          disk8
-------------------------------------------------------------------------------
#  DevNode   UUID                                  Status     Size
-------------------------------------------------------------------------------
0  disk4s2   9A7D56A8-34E3-4CAB-85D4-39CC4BFEF946  Online     575741456547840
1  disk5s2   87CB9D7C-3375-420C-A3F1-88634F6A8A29  Online     575741456547840
2  disk6s2   029F7182-201F-4021-8E9E-189A03B03CC1  Online     575741456547840
===============================================================================
We understand that Terminal commands aren’t for everyone, so we will be looking at ways that we can integrate some of this functionality into future software releases.
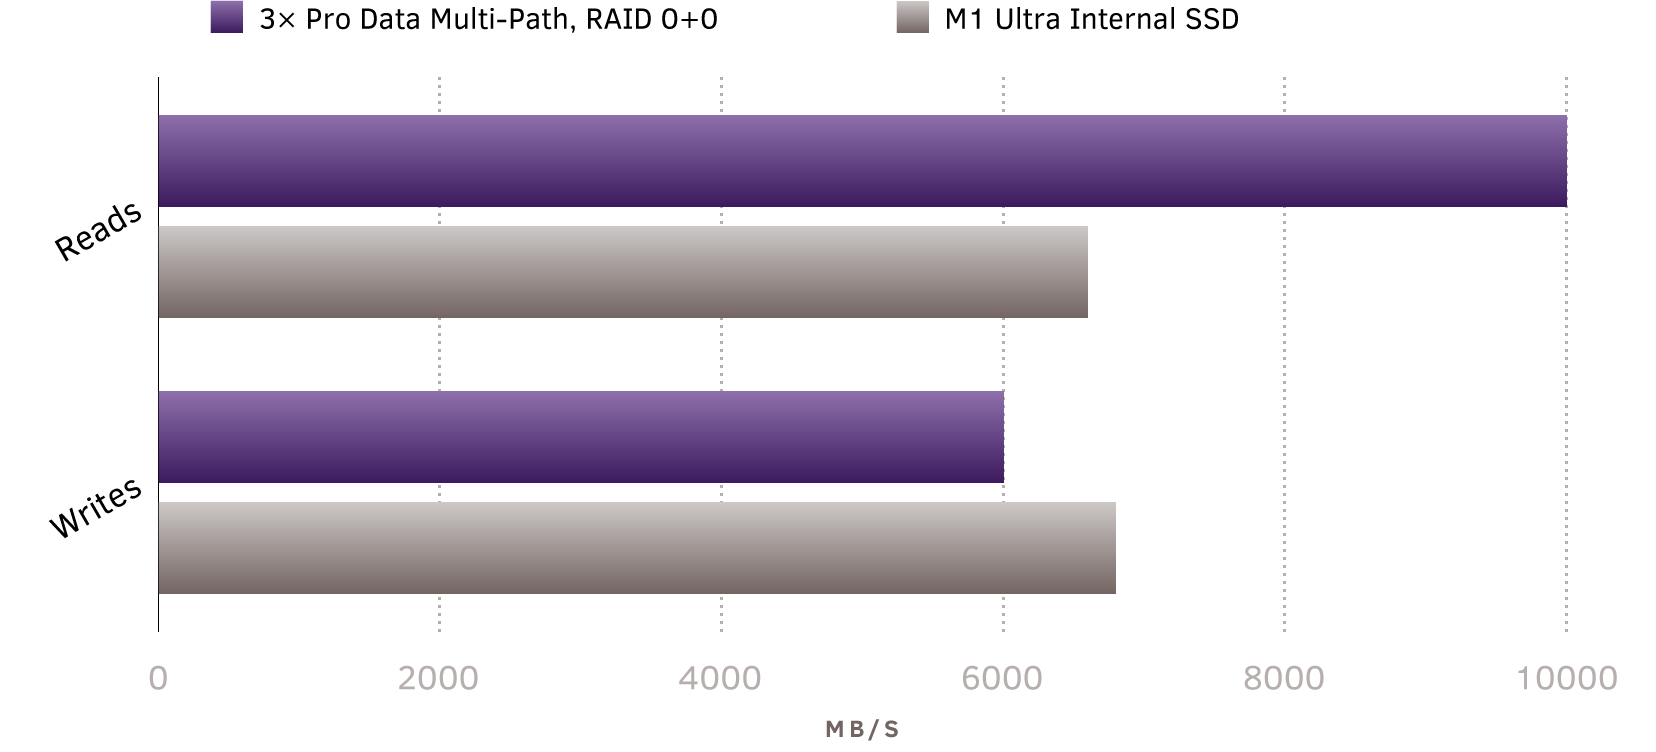
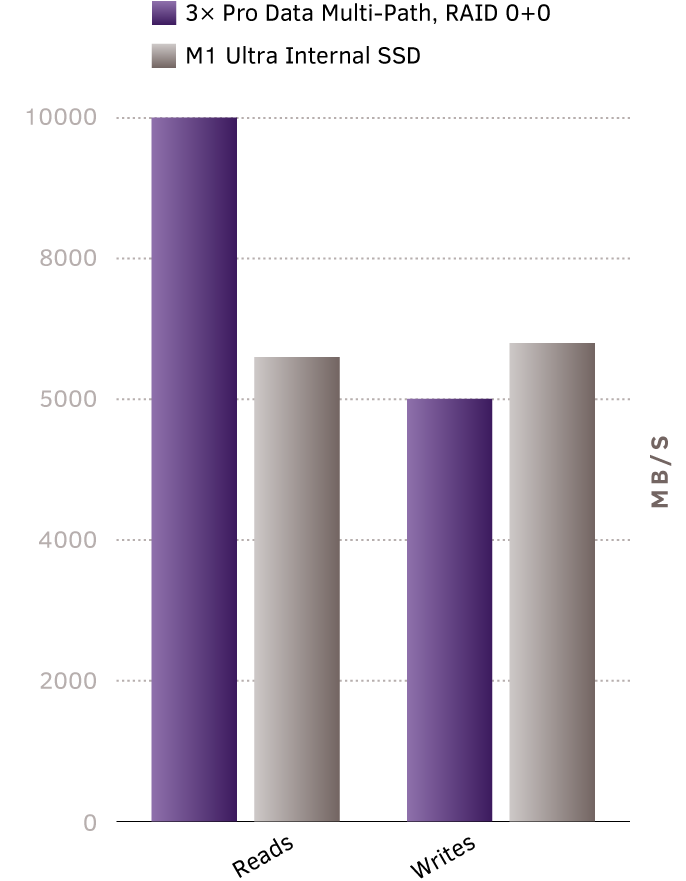
We achieved record-breaking 10GB/s reads, and approached Mac Studio internal SSD performance with 6GB/s writes
From here, we conducted performance tests using the industry-standard open-source Flexible I/O Tester (fio), also used by Apple for their SSD benchmarks, and achieved record-breaking 10GB/s reads, and approached Mac Studio internal SSD performance with 6GB/s writes:
fio Results
2022 M1 Ultra, macOS 12.4 Monterey
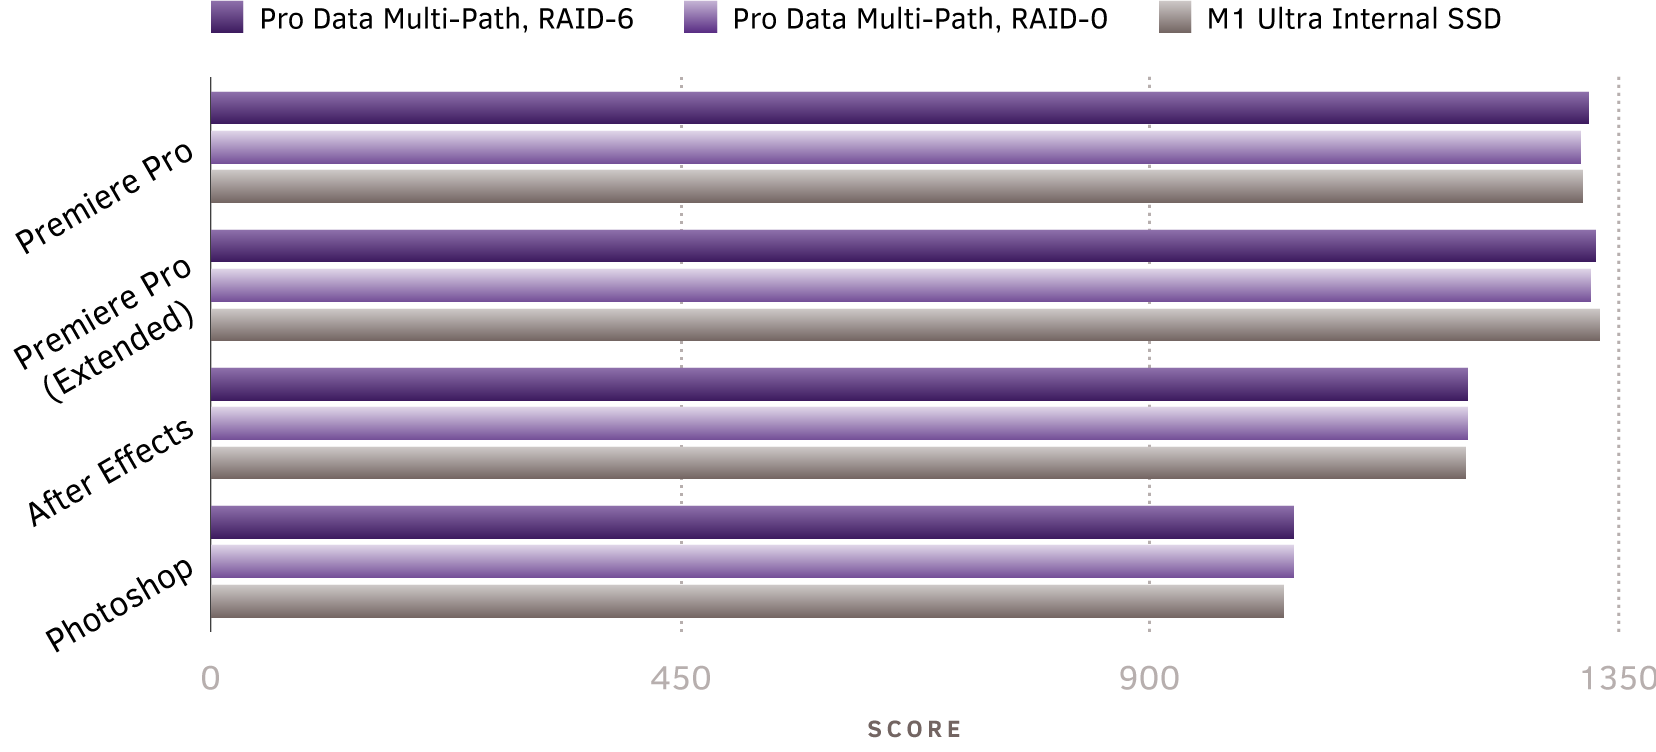
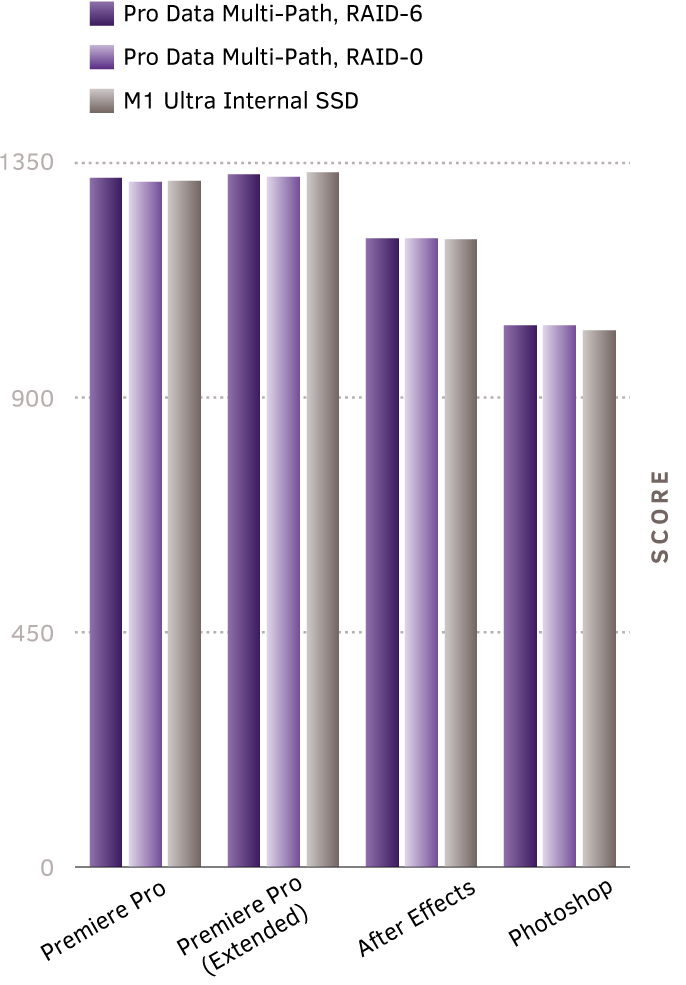
In real-world application benchmarking using PugetBench using only a single multipathed Pro Data, our results also show equivalent performance to the Mac Studio’s built-in SSD, while delivering 3× the storage capacity, in both RAID-0 and RAID-6 configurations:
PugetBench Results
2022 M1 Ultra, macOS 12.4 Monterey
Conclusion
Mac Studio provides the ultimate performance for Mac users on Apple Silicon with M1 Ultra. Pro Data is the fastest Thunderbolt NVMe storage available, and delivers unique storage functionality to Mac users, including capacity expansion up to 432TB, RAID-6 data protection, hardware-accelerated Encryption, expansion using Thunderbolt daisy-chaining, and the flexibility to connect to one or more computers for collaboration with Storage Handoff. Together Mac Studio and Pro Data provide world-record performance for APFS on Apple Silicon, and are the building blocks of the ultimate setup for your next project.
iodyne, iodyne Pro Data, the iodyne Pro Data logo are registered trademarks of iodyne, LLC. Mac Studio is a registered trademark of Apple, Inc.